Love this... love you. x


I challenged myself this week to use one of my least favourite items in a layout... the paper doily! It's not that they are a terrible embellishment its just I never know how to use them and so I gave myself the task of finding a way to incorporate them in my next scrapbook page. For this page I have used The Scrappery's latest kit 'Skye' The chipboard heart tab, the chipboard 'love you' banner, the sequins, tiny pearls and the doily are from their TSK (The Scrappery Kit) Kit. The 'Love this', flowers, leaf and butterflies die cuts are all from the BPK (Bits & Pieces Kit) Kit. The Skye kit is made up of a selection of items from Cocoa Vanilla's Midnight collection along with hand picked complimentary items chosen by Ronelle and the team at the scrappery. 


If you are interested in finding out more about the The Scrappery's 'Skye' kits you can find them HERE Just search for the word 'Skye'


He's Cactus!


Layout completed using The Scrappery's 'Willow Kit' 
Featured range: Good Times by Crate Paper


Back to school - Shark boy


This is my finished product


Tiny Me labels were perfect finishing touch


I found the most perfect shoes for our little shark obsessed boy. This cute little slip ons came from Big W and were marked down to only $7! BARGAIN!!


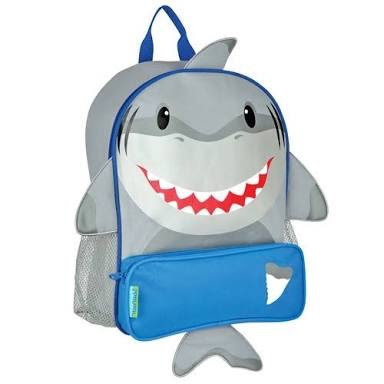
I searched high and low for a hammerhead shark school bag as requested by Mr. 3 but I just couldn't find one suitable for his first year at 'school'. I did however find this adorable Stephen Joseph shark bag! The best part about this bag is that I bought it and had it personalised by the wonderful team at 'Named' 


I was SO impressed with the bag when it turned up, the personalisation is flawless! 


Yumbox original bento lunch box from Milk tooth


Personalised by ****


First day of school lunch


My handsome little man 


                                              post signature

Zachy's 1st Birthday - Construction Style


Ever since I first took this picture of my littlest man I knew his first birthday would involve Tonka trucks... So over the last year I have slowly collected bits and pieces for his birthday. There have been a few design changes along the way... at first I wanted a yellow and black construction theme but then decided it was going to be a little plain looking for a 1st birthday, in the end I settled on a bright and colourful construction theme.


I borrowed a few awesome idea's from Pinterest and made some traffic cone jellies, some Tim Tam traffic lights and we used our Tonka trucks to serve some Cheetos and some pretzels.


Zach's birthday cake was the one thing my mind was set on from the start, he HAD to have a digger cake! I searched high and low for the perfect candle but in the end I painted my own!


I just bought a plain old ordinary number one and painted construction stripes using acrylic paint. The finish wasn't perfect but I loved it anyway.


The cake was the perfect mix of construction and colour!

NOTE TO SELF: Put honeycomb on the cake just before serving... It likes to melt!


Seeing Zachy's little hand reaching out and stealing little bits of chocolate was one of my favourite memories from the day.


One of my favourite items from his birthday decor was his Roberts Confectionary bunting... I simply used tape to attach black and white pictures between the trucks for a cute flashback of the year. The best part is now that his birthday is over I can use the cute cardboard trucks in my scrapbooks! Win Win!


Another of my favourite decorations would be his 'Construction Zone' banner, designed by your's truly and printed through Vistaprint, this bad boy will end up in his bedroom along side his big brothers first birthday banner (a lightning McQueen 'Ron's Pit Stop version) or possibly in the lego corner of the play room ;)


All in all our little man had a pretty amazing day and he was truly exhausted by bedtime. Watching him chase balloons, dancing in the bubbles from the bubble machine and playing in his water table where just some of the highlights of the day for me... I think the highlight of his day was just playing with his toy drill... He LOVES it! 

Happy 1st Birthday to our special little guy, we love you with all our hearts!


Project Life: Whale Shaker Page


Hello Everyone! 
Lets skip the 'It's been forever since I've posted' BS and jump straight in.

Today I am sharing my first ever COMPLETED Project Life page. The photo's from this page were ones I was taking to test out a new way I realised I could photograph my toddler and my newborn, once I saw the end results I knew I had to scrapbook them! Firstly I guess I will share with you my light bulb moment... My toddler is still to little to be able to support my newborn sons head properly and so the photos I can take of them together are limited... you can only take so many pictures of them sitting side by side in the bouncer or laying on the floor before it gets old. 

I realised that if I lay the boys down on the lounge with their backs on the seat and their little bottoms and legs up against the backrest, I could take a picture from above and then just rotate the picture until it looked as though they are sitting next to each other... what I didn't expect was the giggles that followed because of the way they were sitting. The only down side to this method of photographing your toddler or baby is the fact that if they have long hair it may hang weirdly...


For this page I decided to keep it clean and simple. After browsing through my cards I decided the black and lime colour combination was perfect for this layout. I used cards from the WRMK Love Notes and Heidi Swapp's Favourite Things Collections as well as a few random cards from my unlabelled collection (these are cards I have taken out of their box and then forgotten which collection they belong to and so I have popped them into a box of random mismatched cards). The whale die cut is handmade from a printed image of a whale I found using Google Images and the sequins are from Studio Calico. The shaker card I made by printing the whale onto cardstock, I then fussy cut around it leaving a 2mm boarder. I mounted the whale element onto a piece of 3x4 cardstock of the same colour using double sided foam tape. I then cut a 3x4 pocket from a damaged page protector I had and slid the whale card inside.  


I just adored the colours of these sequins and was so glad to find a way to use them in my layout.  I picked out the green, black and white/grey sequins from the mixed pack and popped them inside, I also added some little hearts. The hearts were originally sticky on the back but because I have had them so long when I peel them off the backing paper the stickiness is left behind and I am left with a nonsticking heart that was perfect for my shaker pocket! Last but not least I folded over the edge of the pocket and taped it down with some tape and slid it into place!


My journalling for this card didn't come together until almost the end of the page. I had so many different things to write about but ended up simplifying everything and just went with what the actual photo's reminded me of and how they made me feel. I used my printer to print text on the journaling card... It was my first attempt at printing this way so everything is slightly misaligned and believe it or not I did try to reprint and learnt the hard way that if something is too far to the left you actually need to move your next card to the left too... For some silly reason I moved my next card to the right and it ended up much worse (I'm blaming baby brain) In the end I decided that I could live with the text the way it is and popped it the pocket page and moved on... the fact that it was the last of that card that I had had absolutely nothing to do with it! 


The black and white card was my problem card... I struggled with this one. I wanted so desperately to use the 'Enjoy This' acetate but I loved the clean crisp look of the layout and so I didn't want to layer it over a photo or card but then I thought leaving it clear was a waste of a nice overlay. I also had the problem that I had originally wanted to use a clear sticker with the words 'hello baby' on the lime circle tag but it combined with the acetate and the lime 'this' chippy made the pocket too text heavy. In the end I simply brushed a few strokes of white acrylic paint to the back of the acetate card, a quick and easy fix that ended up being exactly what I think it needed. My order from Sassy Scrappy arrived along with my Simple Stories Carpe Diem fundamentals cardstock stickers and that little anchor sang out to me... a few enamel dots later and I was finished!